I try to not become frustrated. We keep ourselves busy with our chores in the garden and with our new first livestock. Worms. LOL But in my heart and in my mind, I'm almost always visualizing The Big Farm. The "real" farm with acres to view, explore, build, and cultivate. Not sure where in the world The Big Farm is located just yet, but have the plan & dedication to follow the plan to achieve this goal in it's due time. Stuck here within the city limits of a suburban city on the outskirts of the largest city in the state, we are restricted as to what we can do. Restricted by space, time, neighbors, and rules.
The rule I like least? Can't have chickens within the city on less than one acre. (You can't see my sad face right now, but just know...it's there.) Chris, my head farm hand / farm manager, and I have been wanting, dreaming, and reading everything about raising chickens for the past eight or nine years. He probably already has his chicken coop plans designed. A mischievous smile comes to my face when I imagine my neighbors' faces when they hear or see chickens in my yard! It really makes me laugh out loud. However, lucky for them I am much a rule-follower and won't try to have my own chickens until we are properly situated on The Big Farm.
So we have plants! And now worms! I already know my next step will have to be angora rabbits. We can have bunnies here inside the city limits and these adorable fuzzies provide a huge amount of angora wool without giving their life. Plus they multiple like, well...like rabbits! So you can produce a beautiful, clean, expensive wool (to buy enough finished yard to knit one pair of socks will cost you about $50) and baby bunnies on the urban backyard farm.
But the plan is in effect. The Big Farm will be a reality within the next three years. I won't even think about starting with rabbits if 2014 is THE year. It's very exciting, this feeling of standing on the precipice while every cell of your being vibrates in explosive anticipation of leaping out into the great abyss. Where will this dream, this goal, this plan, this journey of life take us next? I'm looking forward to finding out!!
Tuesday, December 31, 2013
Sunday, December 29, 2013
This Week at Ramsey Farms
Merry Christmas
 |
| Crafting Gifts |
 |
| Table's set! |
 |
| Daughter's Cookie Making Hands |
 |
| What did Santa Bring?! |
Glimpse of Spring
Worms, Glorious Worms!

 |
| Worm Hunting |
potted plants!
Notes from the Garden


 The kale continues to grow and generate new leaves. The garlic all have healthy scallion tops! These plants are mulched in with nearly one foot of dried leaves to maximize soil temperatures. The kohlrabi seems to have slowed down, but most plants are over the 2" inch width size for early harvest. And the cabbage doesn't seem to be doing anything, but perhaps it is just going to take it awhile? Will wait and see what the coming weeks produce. When we run out of Christmas leftovers, I'm going to find a nice kale & kohlrabi dish to whip up!
Not-so-new Bread Techniques
I had two batches of my bread not rise very well in the last couple weeks. I have several suspicions including the age of my yeast, ingredient temperatures, the leaking bread machine pan,and too low or too high temperature in the rising process. I took it back old school and made the bread without the aid of the breach machine mixer. It was actually so easy!- I warmed the water up to 125 degrees, warmed the bowl and all the ingredients.
- Added the water, sugar, salt, flour, and yeast to the warmed bowl.
- Stirred then turned out onto very lightly floured surface (again awesome silicone mat!) and kneaded the dough for about 7 minutes.
- I put it back into the (cleaned and rewarmed) bowl to rest for 10 minutes in a warm, draft free spot.
- Turned it back out onto clean, very lightly floured surface.
- Split into 6 equal sized balls. Kneaded each ball several times until it reaches the texture of your earlobe (I just read that on the internet this week - perfect description!).
- Place each kneaded and shaped ball into a greased loaf pan. (I put 2 smaller balls into one large loaf pan, 1 larger ball into a glass loaf pan, 3 small balls into a 9x12 glass casserole dish, and a larger ball into a glass pie pan).
- I placed 2 dishes to rise in my dehydrator machine set to 110 degrees and the other 2 dishes into the oven which had been set to 170 then turned off. Let rise for about one hour or until dough is doubled.
- Bake on middle rack in preheated oven at 350 for approx 20-30 minutes or until top is golden tan.
Enjoy your week and remember to take a moment to celebrate the rising or setting of the sun. Mother nature seems to think it's worthy of momentous celebration each day and each evening, perhaps we should do the same.

Saturday, December 28, 2013
Meatballs & Rice with Cauliflower Greens
Meatballs & Rice with Cauliflower Greens
- 10 prepared meatballs (large)
- 1 Tbsp butter/margarine
- 1 cup rice
- 1.5 cups beef broth
- 1 cup water
- pinch salt

Wilted Greens
- 1-2 lbs cauliflower leaves (or other greens)
- Grease from baking meatballs (opt.)
- 2 Tbsp sugar
- black pepper, salt, curry powder, cinnamon

Monday, December 23, 2013
Christmas
My poor, dear four year old boy...the last few days before Christmas must drag by like being in stuck in traffic behind somebody driving 20 miles per hour on an interstate rated for 75 and you can't go around them! Everyday he asks, "is today Christmas?!" I find it to be a difficult task to tone down the overwhelmingly crazy Santa and gift ideas he gets primarily from school. We don't watch broadcast television, so he doesn't see commercials but boy oh boy does he think Santa Claus is going to bring him lots & lots of toys! I hope he isn't too disappointed.
I'm not going to tell him the truth about Santa, but the jolly old man is rather de-emphasized at home. We discuss the real meaning of Christmas - Jesus's birth, the arrival of God's son on the earth. We do not overdo Christmas with gifts. We do overdo Christmas with food, family time, crafts, and holiday movies and activities. Mostly food. (My personal love language is food! If I offer it, accept it, eat it, like it...lest I may think you don't love me back! :)
Christmas becomes stressful when we try to buy more than we can afford or attend too many events and parties or constantly stay on the go or in a rush. I don't care for that at all. There are so many people out doing their holiday errands, it makes the regular, everyday, routine errands much more difficult. I look forward to January when I can go to the store without battling traffic or hoards of people. Where did all these people come from anyway? It took me over 35 minutes to get to a store that generally takes me about ten minutes to get to the other day! I actually stocked-up and purchased most of my groceries and other necessities for more than a month back just before Thanksgiving - to avoid these insane crowds. So ready for the world to return to it's "normal" flow.
Somewhere in our culture, people got it mixed up in our heads that we have to go into massive debt to afford the "right" Christmas. Again it's the media and marketers working their evil magic on us! LOL If you can't tell your children "no" or you're in credit card debt or other financial situations, you have other problems than just Christmas (no offense - I've been there!) but let me just state that you can have a beautiful Christmas, create wonderful memories, and have a blessed time with your family for very little money.
I encourage gently-used and homemade gifts. There is absolutely nothing wrong with finding the "perfect" book, sweater, jacket, lamp, wall art, wine rack, jewelry, toys, housewares, etc. at an antique, consignment, or thrift shop and giving it as a gift. I'll take a great item and that you recycled and saved money all at the same time - win-win! :) And if a person takes the time to make me something, whether it be food or beverage, artwork, crafts, bath & body products, candles, jewelry, photographs, knitted or crocheted items - that is the most wonderful gift of all! Not only are they giving me something awesome I get to eat, wear, or use but they made it with love and nothing else could be sweeter than that!
My daughter and I have been making things for weeks now. I can't list them all here because, well because you'd know what you were getting! :) Next year we're going to be more proactive about creating gifts for people starting in October!
Oh yeah, I don't send Christmas cards either. But I love Christmas, don't think me a grinch! Just drop by "Ramsey Farms" during the season - our tree is gorgeous (thanks to Uncle Jimmy, Chris, and my kids!), the house smells of pine tree, cinnamon, bread baking, pumpkin spice, peppermint, coffee, cookies, and chocolate and the sounds of children yelling and laughing, holiday music, and conversation fills the rooms, deliciousness is being baked up in the kitchen, puzzles are being put together, wood is being chopped, gifts are being crafted, debt or bills are not being accrued, cards are not being mailed (they are received and thank you!), and oh yeah - Jesus's birthday is coming up in a few days, family is coming to spend the night, and we are going to eat a five-course feast to celebrate!
Happy birthday Jesus!
Sunday, December 22, 2013
This Week at Ramsey Farms
Vermiculture Update
The worms are all still doing well in their small home under my kitchen sink. They enjoy a nice warm bed of damp brown leaves, shredded paper (yes recycling!), and have been fed a delightful meal of crumbled egg shells, finely chopped vegetable leaves, shredded kohlrabi peel, & bread crumbs! Chris brought some more untreated wood to build the large worm box that will stay outdoors. (p.s. He keeps referring to it as a "rabbit box" so I'm concerned he's getting worms and rabbits confused...or we're really going to get rabbits and he just hasn't informed me yet. Either way, it's funny!)Saturday we did some cleaning in the garden and Justice collected several new, fat worms to add to our worm farm! The weather was terrific Saturday - got to 71/72 degrees here in my backyard!
Cauliflower Update
I'm still cauliflower-crazy: checking each and every plant daily, unwrapping each and every plant's leaves to inspect and yes, sometimes measure the beautiful cauliflower heads. It's a game of chicken...or cauliflower now. Allowing the edible head to get as large as it can before it flowers.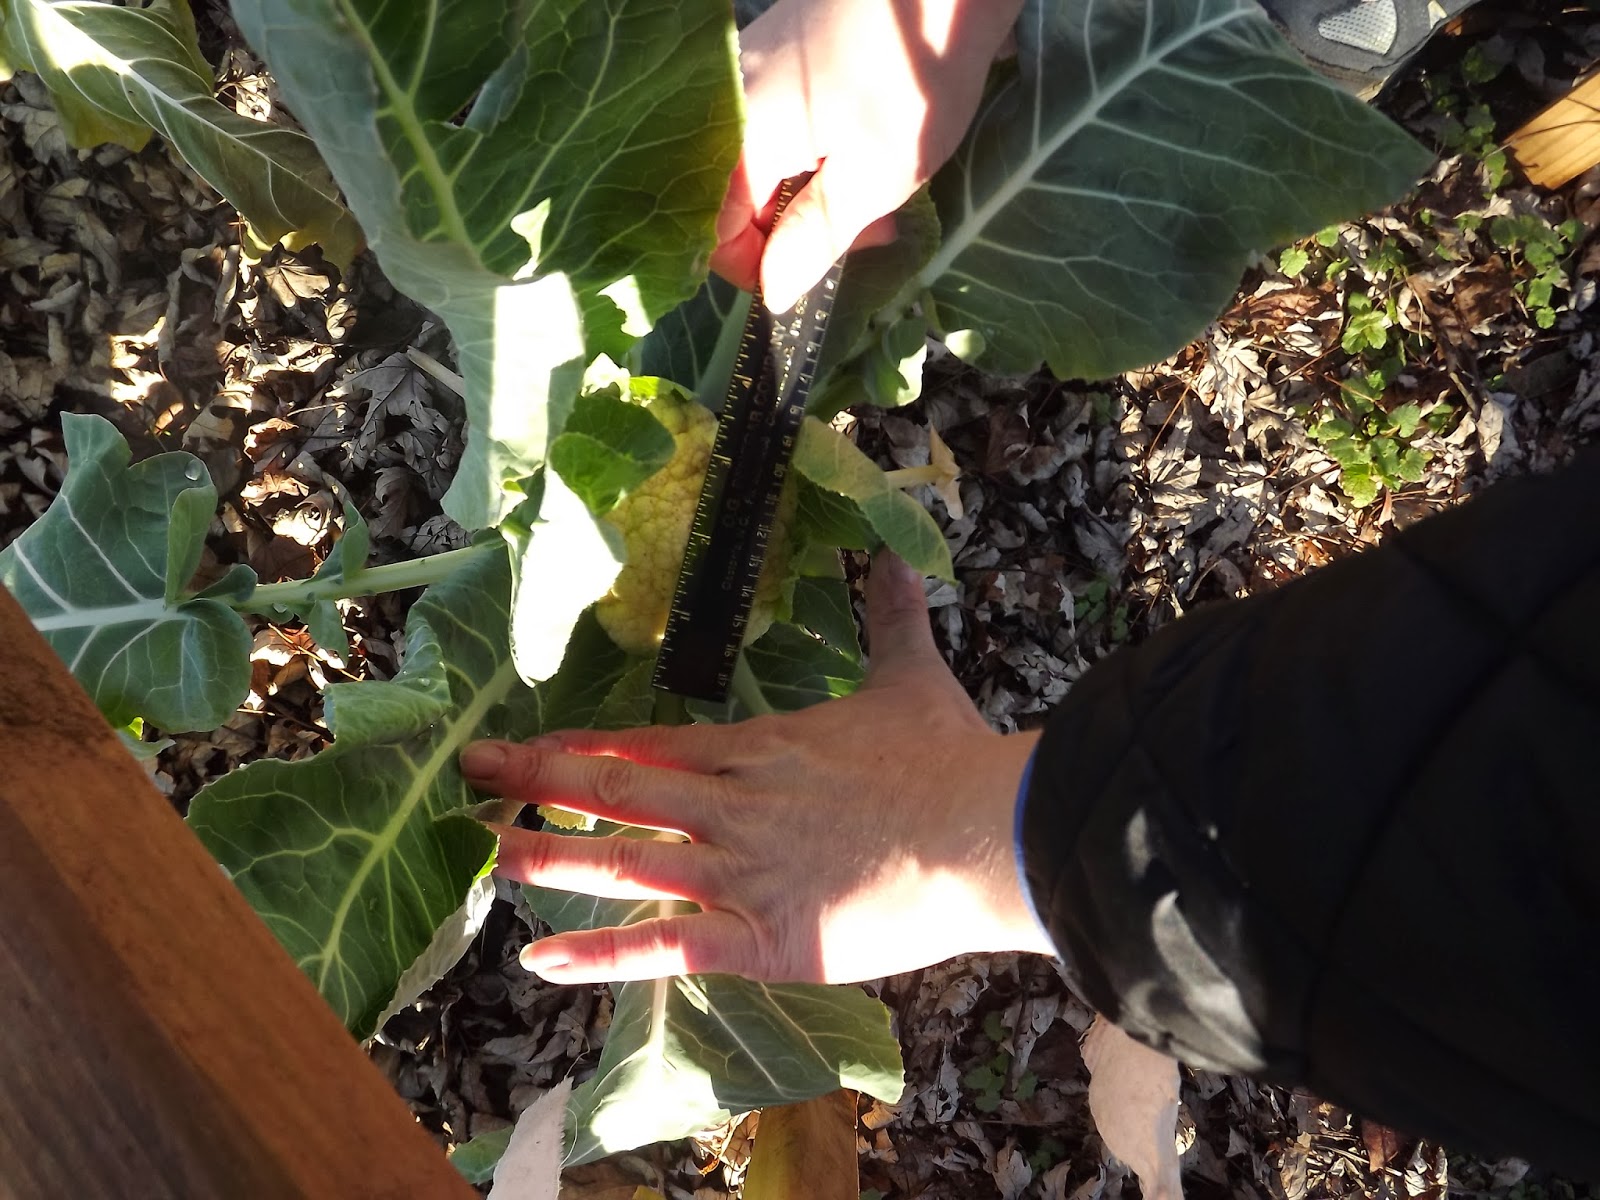
I'm inspecting for signs of worms (green cabbage worm poo - delightful), any sun damage, pest damage, and most of all...curd separation. And since this is my first attempt at cauliflower production...I am researching it ad nauseum, googling for images of cauliflower at harvest, and just trying to get a gut feeling for the whole thing.
I finally found a fabric measuring tape (it's really flexible, like a ribbon of fabric) to more easily gauge the growth and maturity of some of the cauliflower plants. This warm, sunny weather will create a beautiful growth spurt in the vegetable garden just in time for Christmas dinner!
This week has provided several days of 60 and 70 degree temps with forecasts of highs in the 70s through Sunday! (This is December!) In two days some of the cauliflower heads have grown by a 1/2 inch! All the cauliflower are close to 4", most are 4.5", and now 2 or 3 are topping 5" in diameter. Ideally they should be 6 to 8 inches across, being so late in the year I'm just watching the flower and the weather as to decide when to harvest! I foresee a nice cauliflower salad on my Christmas table next week!
On Saturday, I removed two cauliflower plants - one was ultra small and would never amount to much plus had some soft spots. The other was a mid-sized cauliflower but when I opened the leaves to check it out, the rotten stench was horrible! Blech! I'm watching a few others to further signs of rot - to cut and use the parts we can of it before it goes all the way bad. We did harvest one 3.5" plant with about 40% softening, so we were able to eat some delicious, crunchy, raw cauliflower (once I cut away the softening pieces). Also, I wilted the leaves in a pan with oil, salt, pepper, curry, and a pinch of sugar. OMG - so delish! The best parts were where the leaves got crunchy in the hot oil.
Broccoli heads are all at least 2-3 inches in diameter. Those should also get to be about 6" across...will watch and see. I'd love to make a broccoli-cauliflower salad next week for our Christmas day meal but not sure they'll grow that fast even with the 70 degree weather this weekend. And the red cabbage heads are firming up, but small. Stay tuned on this.
I get excited over the fact that we mere mortals can actually make our very own food! Right in the back yard! And it's fresh and clean and didn't travel any miles to get to my table and into my family's bellies.
Warm Tents
This week I did a little experiment (what am I talking about, my whole life is an experiment! lol) If the temperatures are forecasted to drop to 30 or below I cover my precious cauliflowers (my backyard is actually typically 3 degrees colder than the weather channel says it is in my zip code and cauliflower can take it until about 27). I put the thermometer under the tent this morning and found that it was a full 8-10 degrees warmer inside my sheet tent than the air outside the tent! YAY science and yay for warmer plants.Now I want to build a personal weather station in the back yard! :)
The forecast is for highs in the 70s all weekend then by Tuesday it'll drop to 21-24! I'll need to harvest any cauliflower I want to use for Christmas day before the big freeze and protect all the plantings as best as possible for this deep freeze in their sheet-tents, extra leaf mulch, and possibly some plastic bottles of sun-warmed water.
Easy Dinner
I love healthy dinners especially that are cheap, fast, and easy! I threw this together tonight.Black Beans, Rice, and Meatballs
- 1 can black beans, rinsed & drained
- 1/3 cup salsa
- 1/8 tsp soy sauce
- hot sauce
- pickled jalapenos
- pickled banana pepper rings
- 1 glove garlic, minced
- Dried, crushed herbs: basil, hot & spicy oregano, black pepper
- 1 golden cayenne pepper, stem removeed
- 6-8 large meatballs (premade)
- 6-8 servings rice
- Cheese, shredded
- Sour Cream
Mix beans, salsa, soy sauce, hot sauce, jalapenos, banana peppers, garlic, and seasonings. Add cayenne pepper, keep whole (remove before serving) in glass baking/casserole dish. Add cooked meatballs to bean mixture, cover, bake at 350 for 20-25 minutes.
Serve over rice. Top with cheese and sour cream.
Holiday Festivities
It's getting Christmasy around here! Lots of Christmas activities and school programs and gift making and house decorating and holiday meal planning! We did a lot of Christmas baking (and eating) this week, finished up the shopping, and started getting crafty and in the holiday spirit!Hot Chocolate Mix for Christmas
This week my daughter and I whipped up our first batch of homemade hot cocoa mix. I've just always bought the Swiss Miss boxed stuff at the store. Added the finished mix to mason jars, topped with marshmallows, and a custom lid label and red bow. Cute gift idea to pair with a cute Christmas mug or alone!

- 5 1/2 cups nonfat dry milk powder
- 1 cup + 4 Tablespoons sugar
- 3/4 cup unsweetened cocoa
- 1/4 teaspoon salt
- Mix all ingredients. Store in airtight container.
- To use add 1/4 to 1/3 cup (more or less to your taste) to 6 oz. hot water. Stir. Top with marshmallows or whip cream as desired! YUM!
I added a pinch of finely ground chocolate mint or cinnamon or vanilla to my mug. Delish!
Merry Christmas!
- 5 1/2 cups nonfat dry milk powder
- 1 cup + 4 Tablespoons sugar
- 3/4 cup unsweetened cocoa
- 1/4 teaspoon salt
- Mix all ingredients. Store in airtight container.
- To use add 1/4 to 1/3 cup (more or less to your taste) to 6 oz. hot water. Stir. Top with marshmallows or whip cream as desired! YUM!

I added a pinch of finely ground chocolate mint or cinnamon or vanilla to my mug. Delish!
Merry Christmas!
Thursday, December 19, 2013
DIY Dishwasher Detergent: Go Green & Save Green $
Modern conveniences like dishwasher appliances help us all to enjoy the most of our lives by doing some of the "heavy lifting" for us. Not only is dishwasher detergent expensive, it doesn't always do a very good job, and it can be harmful for the environment.
It dawned on me this summer that the cost of the powder, gel, or little packs of detergent to put into the dishwasher was really out of control! I read somewhere on the internet that the cost of basic dishwasher detergent was a minimum of 30-cents per load. My homemade detergent? Less than $0.16 per load (trust me, I made a spreadsheet!). And same basic ingredients for the dishwasher detergent go into the laundry detergent recipe (see that recipe post here).
My homemade dishwasher detergent does as good if not a better job than any store brand I ever tried. I'd enter it into a dishwashing contest because I'm pretty sure it's the best stuff ever. :) And it's made from all natural ingredients most of which have been around for centuries and available commercially for household use since the 1800s. If pioneer women had dishwashers, I bet this is what they might have used. ;)
So it's cheaper, works better, and it's better on the environment plus I just like making the stuff that we use!
So how do you make it, one may ask? Well, I thought you'd never ask! :) It's this easy! (You may double or triple or quadruple or whatever this to make much larger quantities - I just make enough for my jar that sits on top of my dishwasher!)
- 1 cup Borax
- 1 cup washing soda (Arm & Hammer Super Washing Soda is the only brand I have found)
- 2 Tbsp Kosher salt
- 1 Tbsp citric acid (or 1 packet lemon kool-aid brand) - this is optional
- Mix all this in a jar or other sealed container. Mix or shake before use. Use 1 Tbsp for light load, 1.5 Tbsp avg / med load, or 2 Tbsp heavy soiled/full load.
- Add white vinegar (about $1/gallon) to the rinse aid reservoir for sparkling dishes & fresh dishwasher
1/5/2014 Update: I've stopped using kool-aid brand powered lemon flavor in my detergent as it isn't very natural, huh? I did use plain powered citric acid (found in the canning department with the other canning supplies) in my most recent batch. I am considering omitting the citric acid altogether to see if there is a decline in cleaning. What the heck is "citric acid" and just how do they make it and where does it come from and is it necessary? These questions are what leads me to make any changes in what we use on our bodies and in our bodies. So many products have so much added junk in them for longer shelf-life, color, flavor, smell, but aren't necessary and can sometimes be mild to moderately dangerous to some or many groups of people.
7/25/2014 Update: I have not been adding citric acid to my dish washer detergent mix and all is well in the world of dishes. Also check out my recipe for laundry detergent here.
9/2/2014 Update: We have hard water here at the new house and the recipe as written (minus the citric acid and vinegar) causes my glasses, silver, and plasticware to have a chalky feeling, looking film over them. My research leads me to believe the citric acid (or more salt) will eliminate this issue. Also, the new dishwasher in the new house is much older than my previous dishwasher and there is no rinse-aid cup built in, so I have not been adding white vinegar. I am going to add the citric acid back into my recipe and start using this method for adding vinegar to the washer as a rinse aid. I'll letcha know the results! :) R
9/2/2015 Update: (How funny that I updated this exactly one year ago today!) Well we have had to go back to store-bought dish washing detergent and soap. I'm not 100% sure but believe that the extremely hard, mineral-laden water is the reason (it could also be the 20 year old dishwasher, I am still mad that my brand new dish washer is sitting at my old house abandoned!) The glasses had a brownish haze on them either from tea or the water here, but it looked like everything we drank was chocolate milk. So gross! Back to the drawing board on this and one of these days, we'll have to install a water filter. This hard water is tough on dishes, clothes, skin and hair!
Wednesday, December 18, 2013
Making Homemade Bread is Well Worth My Time
Bread Baking: Worth the Time?
We love having fresh baked rolls at dinner around here (and the bread is eaten the next day for breakfast, lunch, snacks, and if we're lucky some may make it to the next night's dinner). I bet we make bread every week, sometimes 2-3 times in one week. See my recipe and pics for my favorite bread HERE.
I think the smell of bread baking is one of the best scents in the world. I imagine if heaven has an scent, break baking might be one of them! And the flavor of fresh baked bread is much better than store bought any day! With the price of bread at the store these days, I am sure it's more economical to make fresh bread than to purchase it and I know it's healthier! My bread has no chemicals or preservatives - just flour, water, sugar, salt, and yeast! And I just personally enjoy making it and really that's the point! :)
So we agree? Homemade bread versus buying dinner rolls or bread at the store: the smell is better, the flavor is incomparable, it's healthier for your body and your pocketbook. But who has time to bake fresh bread in this hectic busy modern society? My bread machine is running right now as I type this article in the next room (now granted most people don't have a full kitchen at their work, but we can get into that later).
It took me all of 8 minutes to put the ingredients into the bread machine and hit start! And that included a 5 minute conversation with my mom who I called to make sure it was okay to use a little bit of all purpose flour with my bread flour to get a full 3.5 cups. (It is and she said all purpose flour was all they had until marketers started pushing "bread flour" during the bread machine craze of the 1990s...I'll do some more research on flours later.)
Less than 8 minutes to get the dough started with a few extra moments to check the consistency (this recipe is almost always perfect for me) and 90 minutes for the bread machine to do it's part of actually creating the dough. After your 8 minutes of labor, you could just set the breach machine to knead and bake the bread. I don't prefer the thick dense loaf my machine makes, so this next part is purely up to how much time you have or want to spend with your bread.
After the bread machine does it's thing on the dough cycle for 90 minutes (actually I forgot about it so it rested & waited on me for probably 10 to 15 more minutes. It's bread, it forgives.) I turned out my dough onto a lightly floured surface. I so love the Pampered Chef silicon mat - I can use it knowing it's clean, dump off the flour, rinse it, throw it in the dishwasher and BAM! So happy I went to the one PC party ever with my friend Gina!
So I knead and shape the dough for about 10-15 minutes. You can just knead it, separate it into 2 balls, shape them, and throw them down on a baking stone. Or divide the 2 balls into 2 greased loaf pans (silicone is awesome, glass is very good, I don't prefer metal pans though I have a few should I need them). I like to make about 30-40 mini balls and place them altogether into muffin pans, loaf pans, or glass bakeware. This yields bunches of dinner roll-ish size bread rolls which tends to disappear faster than when I just made a boxy loaf or even a pretty round style bread.
After my little dough balls are in the bakeware, I lightly brush them with olive or canola oil then sprinkle with kosher salt and crushed, dried herbs. Today I used basil one one batch and chocolate mint on another and one just with salt. {Note to self: Next time use sugar and chocolate mint on a pan!} Now it's time to rise! Time and location will vary. I have my oven set to warm (about 170 degrees) and will leave the bread in there until time to bake (in this case about 2 hours)!
Bake at 400 degrees for 20-30 minutes or so! Remove from oven, allow to cool for a few minutes, remove from pan and allow to cool on cooling rack. Or eat it while it still burns your finger tips! Either way is fine by me! :)
So my labor time was 18 minutes. Machine time 90 minutes. 36 rolls for $1! YAY! And just wait till ya taste it warm from the oven and slathered in butter. I just ate a late night snack of a roll, broken open, smothered in butter, and liberally sprinkled with cinnamon and sugar. Hmmm, it'll make ya wanna smack your mama! (As they say). :)
Tuesday, December 17, 2013
Kohlrabi: Science Experiment or Tasty Treat?
Kohlrabi Tasting


Potato Kale Kohlrabi Soup
10 min prep time + 50-60 min cook time ~ Makes about 8 to 10 servings (?)- 1 Tbsp canola oil
- 2 spring onions, chopped
- 1 garlic clove, finely chopped

- 12 ounces stock or broth (I had potato stock)
- 60-72 ounces water
- 6 red potatoes, diced
- 6 baby carrots, sliced or diced
- 1 celery stalk, chopped
- 1 golden cayenne pepper, stem removed, left whole
- Fresh herbs: lemon thyme, rosemary, oregano, parsley, & German thyme
- Dried sweet basil, crushed
- Black pepper
- Kosher salt
- 18 ounces whole milk
- 1 kohlrabi bulb, chopped
- kale and kohlrabi leaves, torn to small pieces

"Kohlrabi looks like a science experiment gone haywire."
Monday, December 16, 2013
Be Sure to Check Out Our Farm & Garden Pics!
There are a few pages in this blog for you to check out our photos!
http://ramseyfarms.blogspot.com/p/2013-spring-garden.html This link takes you to some fun pics of our garden this year 2013.
Click Here to view our 2013 Thanksgiving album.
Here's a look back at the spring garden 2012.
http://ramseyfarms.blogspot.com/p/2013-spring-garden.html This link takes you to some fun pics of our garden this year 2013.
Click Here to view our 2013 Thanksgiving album.
Here's a look back at the spring garden 2012.
Sunday, December 15, 2013
This Week at Ramsey Farms
I Dislike Winter Cold
The weather is starting to get to me. I added a countdown to spring to this blog's home page! I'm constantly checking on how low the night's temperatures will go. And worse? I'm obsessing about the Weather
The process of locating the property I want to buy (a.k.a. The Big Farm) has unofficially started thanks to my daydream tendencies. The official kick start to this endeavor will not be until February/March 2014. However, I believe that I have decided based on weather and warmth that this family will be relocating southward. Today anywhere from Savannah, GA south to Orlando, FL as far east as the Atlantic and as far west as Mobile, AL. Georgia-Florida line. The current country song, "Sunny and 75" keeps playing in my mind. This case of spring fever will never end so let's fly south like the birds do and not worry with these 30s, 20s, and even colder temperatures.
Spring Garden Planning for the Kids
 It's always exciting when our teenage daughter actually wants to participate in something with us. My nerdy garden planning software was just the trick to get her interested in building her own 4'x8' raised garden bed that she and her little brother will care for in the spring. She has a super plan created with potatoes and
 nasturtiums. The nasturtium flower is an awesome companion for many plants. It deters aphids, squash bugs, and other pests while attracting beneficial insects. We just learned too that the leaves, flowers, and seeds of nasturtiums are edible and great in salads!
I Dream in Cauliflower

Thursday night the forecast was to drop to about 23/24 so once again we lovingly tucked in the crops for a cold winter's night! Everything got a sheet-tent over it except for the kale and garlic.
 I may have mentioned blanching the cauliflower in a previous post. This is when you tie up the outer leaves around the cauliflower head to protect it from the heat and light of the sun. Here is a pic of some of the cauliflower plants with their clothespins or ties on them.
 I did some kale research this week to find out about continual growth cycles and life span of this sweet hardy green. The kale in my garden now should survive throughout the entire winter ("overwintering") until it bolts (turns to flowers then seed) in the spring! NEXT YEAR! This is a long term relationship right here! haha! And the cool thing is that by harvesting the larger, older leaves of the kale plants, they will continually produce new baby leaves from the center all winter until it bolts! I'm pretty sure I did not know this little bit of info until today and I'm quite excited about it (as anyone who knows me would guess)! So fresh kale here all winter! Need some? Give me a call! :)
 |
| Afternoon Moon in Black & White by Ramsey Penegar Available Unframed Prints: 8x10 $10 - 11x14 $25 - 16x20 $35 - 24x36 $60 |
Wednesday, December 11, 2013
Easy Crockpot Chicken Breasts & Kale Slaw
I only had a few minutes to spare yesterday afternoon but wanted to make sure I wasn't scrambling at six o'clock to make dinner. (I hate that feeling of starving to death while I'm trying to fix food for other starving people!) It was 3pm and I knew I was running out of crockpot cookery time.
 I harvested some kale from the garden to make a dish I had not yet tried: Kale Slaw. Click HERE to view or print the recipe straight from Food.com (my favorite recipe site). I included celery, but since I was out of carrots it was just kale and celery with the dressing. I also interchanged some of the spices. I used chili powder instead of cayenne, just a pinch of salt, and omitted the allspice and cloves. I didn't even bother measuring the herbs and spices - I usually just wing that part of it. Most of these spices were herbs I'd dried from the garden, too!
 Click
Click
The kale slaw was stupendous! Chris and I both liked it very much and will definitely make it again. Next time, I'm going to include carrots, celery, and apple! I believe any type of nut (walnut, pecan, almond) would go well in this along with raisins or dried cranberries, and possibly sesame sticks. We ended up mixing up cut chicken into the salad so I foresee this becoming a main dish and doing some experimentation in the next week or so as we harvest the kale!
Bon appetit!
Chicken
I threw four large chicken breasts into the stockpot, poured in half to one whole cup of white wine that I'd opened Friday (slightly vinegary, not drinkable), then seasoned the chicken with pepper & dried herbs: basil, rosemary, oregano, lemon thyme, and parsley. Cooked on high in the crockpot for about 3.5 hours. SUPER EASY and everyone raved about it!Kale Slaw

 Click
Click The kale slaw was stupendous! Chris and I both liked it very much and will definitely make it again. Next time, I'm going to include carrots, celery, and apple! I believe any type of nut (walnut, pecan, almond) would go well in this along with raisins or dried cranberries, and possibly sesame sticks. We ended up mixing up cut chicken into the salad so I foresee this becoming a main dish and doing some experimentation in the next week or so as we harvest the kale!
Bon appetit!
Tuesday, December 10, 2013
Dinner Menu Planning: Save Time, Save Money, & Stress
I know this is going to sound so nerdy, but it is what it is. It's important for us to eat dinner together as a family nearly every night of the week and for me, it's important to feed my family a healthy, wholesome meal that doesn't blow my monthly grocery budget. I see nothing wrong with a frozen pizza or meal, hot dogs, or mac & cheese but I don't want to serve those items for dinner routinely.
I'm a planner by nature, so the past few years we've implemented a weekly menu. This helps everyone to know what's for dinner, speeds & simplifies preparation, reduces the time it takes to decide what to cook, and helps me to use what we have on-hand rather than having to run out to the store several times a week! The menu is never fully written in stone, it's flexible and somewhat rearrange-able. It's just a very helpful organizational tool for our house.
Here's what this week's menu looks like at our house:
- Sunday - chili & cornbread & (yes) boxed mac & cheese for the kids!
- Monday - leftovers from last night and grilled cheese sandwiches
- Tuesday - crockpot chicken breasts, kale slaw (kale from the garden), crescent rolls (yep from the refrigerated food section), and yet again leftover mac & cheese for the kids
- Wednesday - leftover chicken with potatoes, onion, & something else (to be determined)
- .....................what we actually had was hot dogs, roasted potatoes, and baked beans (remember my comment on rearranging and flexibility?)
- Thursday - bean, rice, and kale soup with homemade bread
- .................what we actually had was creamy chicken breasts (crockpot with cream of chicken soup, herbs, water), brown rice, kale slaw salad (similar to what we had the other night), homemade bread
- Friday - hot dogs??? (may try to hit the store since it's been a couple weeks!)
- ...........We are having steaks on the grill, potatoes, green beans, kale slaw, bread
- Saturday - Parents out / Kids pizza!
Monday, December 9, 2013
Rain, Rain, Go Away
It's been raining for at least four maybe five days now. I just want it to stop for half an hour so I can go inspect my crops! I want to pick off any cabbage worms, measure the kohlrabi, look at the broccoli, and squeeze my cauliflower! It's nearing harvest time for most of my garden and I am feeling rather anxious! :)
Happy gardening! ~Ramsey
"Cauliflower is just cabbage with a college education." Mark Twain
Happy gardening! ~Ramsey
"Cauliflower is just cabbage with a college education." Mark Twain
This Week at Ramsey Farms
Seed - from which all life comes - are wondrous tiny little things!!
 Sunday morning I took some time separating the seed from the leaves and stems of lettuce flowers I'd been drying for a few weeks and finally made time to glean the sweet & cinnamon basil seeds from their dried stalks. It continually amazes me that food can be grown simply by putting these minuscule objects into some soil and providing a little sun & water! It also smelled so nice and Christmas-like too as the cinnamon basil is so deliciously aromatic! My hands, my clothes, and the entire kitchen was filled with a warm cinnamony scent.
In order to become more self-sustaining as a "farm", we gather, dry, save, and use seeds from our best produce each year. I have also collected seed from other local farms and growers as well. Next spring, I hope to be able to give away and sell lots of aromatic basil and lemon thyme plants to friends, neighbors, family members, and herb lovers! Seed is much cheaper than buying seedlings so our goal for the spring garden in 2014 is a minimum of 50% seed growth with the idea to continue to increase that each season to nearly 100%.
Aloe Babies
 The massive aloe plants I so luckily inherited from my mom when she moved, are all doing well indoors for the winter and in fact have so many "aloe babies" (or pups) popping up in their pots and even from their long, old stem that I've decided to have a baby aloe sale in early spring!! (My mind continuously wanders to the spring!) So far I've counted about 20 aloe pups so I'm quite thrilled about that. I am so fascinated by reproduction this week - that's weird. I have no idea how the first aloe was born and if aloe has seeds, I've never seen them. The only way I am aware that the aloe can reproduce is by sprouting little aloe pups from stems that come off the main plant or by cutting a leaf and rooting it. It's always a proud moment when I find a new aloe baby has near-magically appeared alongside the mother plant!!
I use aloe in many of my homemade bath & beauty products including bar soap, body wash, liquid hand soap, body lotion, and deodorant - which I am now referring to as "underarm conditioner" which is a whole 'nother story for another day. :)
 Great Outdoor Playground
We took our four year old son on a four-hour hike up the mountain Sunday. The weather was perfect for it - sunny with deep blue skies and no breeze and cool. He loved it and stood on top of the pinnacle with his arms in the air yelling, "I'm the king of the mountain!" I think it's more important for all of us to be outside than play with any toy they have available on the market.
Other News from the Field
Just a side note - Monday's high temp in my backyard was 60 degrees! Last week we had frost and freezing temps down to 20 and by Friday it's supposed to be 76. North Carolina weather has got to be the most fickle in the world! Based on the forecast, I don't have to worry about covering the garden at all for the next ten days!!This week I spoke with the president of my local farmer's market association. I'm excited to learn more on this farm journey and he is full of knowledge. I will be doing more research for kitchen inspection and permits to produce and sell my homemade jams, jellies, and preserves as well as my line of personal bath and beauty items. One big highlight - February 18, I will be attending the farmer's market association board meeting!
Oh my gosh, have you ever tried garden planning software?! I know I am such a nerd, I stayed up until 1:30 Tuesday morning playing with the software I found online. I do have my 2014 garden all planned out and ready to go though!! Very exciting stuff!
Thursday, December 5, 2013
Worms & Bugs
Spent part of my mornings this week hand-picking green imported cabbage worms off my cauliflower,
 cabbage, and kohlrabi plants. :( I wonder if those would make good fishing bait? I am researching lady bugs to help control these particular green worms and other garden pests and what to plant to encourage the pretty red beetles and other beneficial insects to move into my yard and garden. We don't use pesticides or chemical fertilizers in the garden because we want it to be organic and all natural.
I learned a new word this week: insectary. Basically that's a garden plot or area that is planted specifically to attract beneficial insects! I am already planning strategic companion plantings to help attract the good bugs and repel the bad ones as well as creating borders and small spots for these helpful plants.
Another beneficial for your garden is vermiculture - or worm poop! My daughter is the resident "expert" on vermiculture having learned about it in a summer camp several years ago and we had our very own under-the-kitchen-sink worm farm for at least a year. We lost those poor worms to a kitchen sink leak but today I became a vermiculturist a.k.a. Worm Farmer again!
 The new worm farm is a very small shoebox-sized plastic box with small air holes drilled into it and containing a nice worm-loved mix of wet shredded newspaper, a little garden soil, a few wet, brown leaves, and a little food by way of coffee grinds and shredded green. Ramsey Farms Worm Farm (lol) is already home to about 55 to 60 red wrigglers I "hunted" from my backyard today. They include both the Eisenia fetida and Lumbricus rubellus species.
These little guys will multiple faster than bunnies, eat kitchen scraps like egg shells, coffee grinds, and raw vegetable scraps, and the end product is a rich, rich compost to use in the garden or mix with topsoil to make an excellent potting soil for spring plants! I was itchin' to do something garden-y today and I got to dig around in the dirt for a while, but I am already planning a much larger worm farm to build outdoors in the coming months that can help supply nutrients to my entire garden.

I learned a new word this week: insectary. Basically that's a garden plot or area that is planted specifically to attract beneficial insects! I am already planning strategic companion plantings to help attract the good bugs and repel the bad ones as well as creating borders and small spots for these helpful plants.
Another beneficial for your garden is vermiculture - or worm poop! My daughter is the resident "expert" on vermiculture having learned about it in a summer camp several years ago and we had our very own under-the-kitchen-sink worm farm for at least a year. We lost those poor worms to a kitchen sink leak but today I became a vermiculturist a.k.a. Worm Farmer again!

These little guys will multiple faster than bunnies, eat kitchen scraps like egg shells, coffee grinds, and raw vegetable scraps, and the end product is a rich, rich compost to use in the garden or mix with topsoil to make an excellent potting soil for spring plants! I was itchin' to do something garden-y today and I got to dig around in the dirt for a while, but I am already planning a much larger worm farm to build outdoors in the coming months that can help supply nutrients to my entire garden.
Wednesday, December 4, 2013
Homemade Biscuits & Leftover Turkey Potato Soup
 |
| Potato Turkey & Greens Soup |
The soup got mixed reviews - my dinner guest ate two or three bowls full, but I for one, was not impressed. I feel like it's missing something - maybe needs some bacon drippings and crumbles or salt or should have used chicken broth rather than the potato broth I did use? I don't know, if you have any ideas please leave me a comment!! :)
The highlight of tonight's dinner was not the soup. The homemade biscuits were the star of this show.
You will love these biscuits! They are super easy and quick to make and don't require milk! (I was out.) These biscuits come out so well - real layers that pull apart! OMG even Miss Picky my daughter said they were perfect! Tell me what you think if you try these.
Fast, Easy & Delicious Homemade Biscuits


- 3 cups all-purpose white flour
- 1 tablespoon baking powder
- 3/4 teaspoon baking soda
- 1/2 teaspoon salt
- 2 tablespoons sugar
- 1 tablespoon powdered milk
- 3/4 cup butter, cold
- 1 extra large egg, slightly beaten
- 3/4 cup water
- Mix all the dry ingredients. You may store this for up to 3 months in an air-tight container in the fridge or freezer.
- To make biscuits: Chop butter into dry ingredients until it resembles course bread crumbs.
- Beat egg with water then combine with dry ingredients.
- Turn out onto lightly floured surface and knead 5 to 6 times (at least).
- Roll 3/4 inch thick and cut in 2.5" diameter circles.
- Place on greased cookie sheet, bake at 400 degrees for 10-12 minutes or until light golden brown.


Monday, December 2, 2013
You Can't Buy a Farm if You're In Debt

Five years ago, my husband and I took the Crown Financial Ministries Bible Study / Class at our church. It changed my life forever. The primary gist of Crown is that debt is a sin, spending more than you earn is bad, saving & investing is critical, giving is good, and that financial freedom is actually possible! We didn't know it at that time, but the journey to become debt-free with the ability to be more generous with our time and money would be key to being able to purchase a farm of our own one day soon.
It was difficult to see the light at the end of the tunnel in those early days. I am nothing if not optimistic, systematic, and determined when I set my mind to do something. After taking a good hard look at our financial picture, developing a solid plan of where each dollar will go, and a few other administrative housekeeping things - we saved our $1,000 emergency fund!! We had never saved that much money in our lives and the feeling was incredible! If we can do that - think of what else we can accomplish!! YAY!
Paying off the credit card debt was our next goal. That did seem remotely possible, but likely to take a long time. This past spring, I crossed that finish line and paid off the final card! The next few months I spent socking away every extra penny, nickle, or dime I could find and grew my family's emergency fund to about six months living expenses. The emergency fund is for true emergencies that you can't cover with cash - the fridge dies, the car blows up, unexpected medical bills, etc. It gives me a peaceful feeling of security to have that in place.

Now the focus is on retirement funds, the children's college funds, and annihilating the small home equity loan I have. I am so ready to knock that payment out and put the full force of this gazelle intensity to abolishing the home mortgage loan. I hope to find "The Farm" and sell my current home within the next two to three years so that would eliminate the current mortgages and any profit from the sell would be a big help in the down payment on my big farm (wherever it is - I don't yet know).
If you want to change your financial life and forecast, you can. It takes dedication of putting systems and programs into place to help you stay on track. I'd be happy to help anyone who wants to figure out how to stop living paycheck to paycheck start on this road to financial freedom - just email me! I think I may need to volunteer and facilitate a Dave Ramsey or Crown Financial class one of these days....
Sunday, December 1, 2013
This Week at Ramsey Farms
This week was filled with Thanksgiving preparation! Plus a few frosty nights we had to mulch-in and cover the garden crops with sheets! I harvested all the lettuce Wednesday morning to both save it from the frost and eat it for our Thanksgiving salad! I really want to thank my Uncle Jack from Goodnight Farms for his expert advice and guidance on protecting my fall garden from the frost. I collected info from him, my local extension office agent, and good friends who've been gardening for many years to help me to know what to do. I can learn a lot on the internet and from books, but experience is far more valuable and I love picking the brains of those way smarter than I am.
My farmhand, Chris has an awesome system of stakes and supports to allow us to easily cover the plants with the old sheets while avoiding the sheet actually touching the plant. I noticed the cauliflower leaves had frost damage where the sheet was on them. Chris also split additional firewood to heat the house this week. (Thank you, sir!)
I learned that you can actually eat broccoli, cauliflower, and kohlrabi leaves! (Don't ask what a kohlrabi is...we shall get to that in a post soon as harvest time is coming up fast!) We used some of each plus some fresh organic kale from the garden in a soup last week and to make "kale chips" too. My four year old and my friend Katie absolutely loved them - even though I over cooked them and to me they tasted like burned popcorn. (Katie also ate my strawberry-lemonade-vodka cake, so not sure that she is a good example! haha) I will make the leafy green chips again, but keep a closer on eye on them while they're in the oven.
This year we prepared a veritable FEAST for our Thanksgiving meal! The Executive Chef here at Ramsey Farms (okay, okay...it's just me) planned a mouth watering five course meal with all the fixings and a spread of seven wines for pairing!! I will share our menu, some recipes, wine pairings, and wine notes with you over the next few days.
I also learned that sometimes the cauliflower needs our help. If the white flower (the part you eat) gets too much direct sun, it can discolor or even ruin the vegetable. Usually the leaves of the cauliflower plant will "self-blanch" but sometimes need our help. I used wooden clothespins to ensure all the cauliflower heads were neatly and modestly closed.
We are coming up on harvest time soon for most of the fall produce, discussing removing a tree from the property, studying up on angora rabbits, drooling over the spring seed catalogs, learning about the USDA rural mortgage programs, figuring out new crop planting areas, looking at plans to build rabbit hutches, daydreaming of larger, more rural properties, and more preparation & research on the next leg of this journey: a real farm of our own!
Enjoy your week & get outdoors as often as you can! :) ~Ramsey
Saturday, November 30, 2013
Sunset Ritual

 Sunset is my favorite time of day; it's important to me to get outside and watch this daily phenomenon. It's a strange addiction. There is something cathartic and humbling about seeing the sun set or rise. I know that all the world is as it should be when these events happen just as they have a million and one times before and will continue to do at least another million or so times. How insignificant my worries or problems seem - no, how insignificant I realize I really am - when I see the glory of the setting of the massive, powerful, & magical sun. These days with daylight savings time, the sun sets just after 5pm! Gotta head outside now...Will post some pics of today's sunset later! For now, enjoy these from earlier in the year! :)
Below are the pics from 11/30/13:


My Favorite Bread Recipe
 Sure it probably seems so much easier just to run into the grocery store and pay $2 for a loaf a bread. But I just love the feeling of creating something with my own hands and the fragrance and taste of fresh, homemade bread cannot be duplicated!
- 10 pound bag of bread flour......$3.38
- 5 pound bag of sugar................$2.68
- 4 oz. jar of yeast.......................$4.58
- 26 oz. container of salt..............$1.29
So for about $11.93 total, I'd have enough flour to make 12 batches of my bread. That's less than $1 per batch for two smaller loaves!!
 |
| My homemade herb bread (one batch) |
Add these ingredients to your bread machine (be sure to follow your machine's instructions for the order of ingredients).
- 1.5 cups water
- 2 tsp. sugar
- 1 tsp. salt
- 3.5 cups bread flour
- 2.5 tsp. yeast
I select the dough cycle and start! During the initial stirring and kneading phase I do check in on the dough. If it's too dry and flaky, I had a teaspoon of water. If it's too sticky or watery, add 1 tablespoon flour. Check on it again in about 5 minutes and repeat if necessary. It should be slightly tacky to touch, but not stick to your finger. Once your dough has the right consistency, just let the machine do the work.
My machine's dough cycle is 90 minutes. When it completes it's dough making cycle, turn your beautiful dough out onto a lightly floured surface. Knead the dough by hand and work it into two nice, big balls. Put each ball into an oiled loaf pan (I prefer glass or silicone).
Cover the bread lightly and let it rest in a warm, draft free spot. During cooler weather, I normally will put my oven on low (less than 200 degrees), put the bread pans in, and leave the oven door slightly ajar. I will use my dehydrator or a warm, sunny window to let the bread rise during the hot weather. I let it rise until it has just about doubled in size. Depending on the temperature of the air around the bread this may take anywhere from 60 minutes to 3 hours. It takes less than an hour in my oven as mentioned.
Once your bread has risen to about double it's original size - it's time to bake! Bake on 350 for about 20-30 until the top of the bread is golden brown!
EAT & ENJOY!
Wednesday, November 27, 2013
Life in the Garden
Wow I think we've already experienced at least seven nights of 27 degrees or below already! There were snowflakes falling with the rain today! This is not normal weather around here! I have worn shorts to the Christmas parade in years past! Tonight is supposed to be 23 according to the Weather Channel, which means it'll be about 20-21 in my backyard.
I harvested all the lettuce this morning to use for our Thanksgiving salad. The rest of the fall garden - broccoli, cabbage, cauliflower, kale, kohlrabi, and garlic - has been mulched in with leaves over the past few weeks (our first frost was October 24) and this afternoon before the sun set, we covered each garden row using an old bed sheet as a floating row cover. All the sheets are from the 70's - my mom blessed us with these gorgeous, wild, yet valuable frost covers when she moved. It looks like a camp of miniature psychedelic-print tents in my backyard, but so far they have preserved all the life in my garden.
Keep your fingers crossed the adorable baby produce survive this hard frost tonight! Most of these little beauties are "due" for harvest during the next week or two!! This is my first time planting a fall garden and most of these veggies are new to me. I expect the garlic to be ready any time from December - February.
It's all one big experiment! :)
Easy Sausage & Potato Casserole
Sausage & Potato Casserole
Made this for dinner last night for a quick, simple meal of meat and potatoes! Everyone loved it, even my picky child! The adults enjoyed a nice, light glass of the 2013 Georges Duboeuf Beaujolais Nouveau that paired really well!Ingredients
1 pound bulk pork sausage
1/2 cup green pepper, finely chopped
1 jalapeno chopped
1/2 cup onion, finely chopped
1 1/2 cups diced potatoes (you can use fresh or frozen or even hashbrowns)
1 cup shredded cheddar cheese
1/2 cup flour
3/4 tsp baking powder
1/8 tsp salt
1/2 Tbsp butter or margarine
(The 4 ingredients in purple can be substituted with 1/2 cup Bisquick instead)
1 cup milk
1/8 tsp pepper
2 eggs
Directions
- Preheat oven to 400 degrees. Grease 8x8x2-inch casserole dish.
- Brown sausage, peppers, and onion in a 10-inch skillet over medium heat, about 8-10 minutes.
- Mix sausage mixture, potatoes, and 1/2 cup of cheese then spread into greased casserole dish. Save 1/2 cheese for topping at end.
- Whisk remaining ingredients until blended and pour over sausage potato mixture in casserole dish.
- Bake about 35 minutes until knife inserted in center comes out clean.
- Sprinkle with remaining 1/2 cup cheese and bake 1-2 more minutes until melted.
- Let stand 5 minutes prior to serving. Top with hot sauce, salsa, and or sour cream if you like.
Bon Appétit!
Subscribe to:
Posts (Atom)